The Lomo effect arrived in the early 80s after the invention of the Russian film camera, Kompakt Automat. A camera that produces blurry photos with minimal grain noise. The following steps will show you how to create a lomo effect in Photoshop using filters and adjustment layers. As an illustration, to create a lomo effect on the photo, we will add a noise filter, a radial blur filter, a gradient map adjustment layer and finally a Brightness / Contrast adjustment layer. As usual, duplicate the layers first to keep the original photo from getting damaged.
1. Open Photo And Duplicate Layer.
Select menu File> Open to open your photo then duplicate the background layer by pressing Ctrl + J key.
Open photo then duplicate layer.
2. Add Noise On The Duplicate Layer.
Make sure the duplicate layer is the active layer by clicking on it, then go to Filter> Noise> Add Noise. I will fill in the amount of 5 percent, distribution: Uniform and check Monochromatic. Click the OK button.
Add Noise.
3. Add a Radial Blur.
Go to Filter> Blur> Radial Blur. Fill in Amount 5, blur method: Zoom and Quality: Best. Click the OK button.
Add Radial Blur.
4. Add a Gradient Map.
Go to Layer> New Adjustment Layer> Gradient Map. In the New Layer dialog box, click the OK button. On the gradient map properties, click on the drop down menu (circled in red) to open the Gradient Editor.
In the Gradient Editor, select a preset by clicking the grinder icon, then selecting Color Harmonies. In the Gradient Editor dialog box, select Replace. Then click Gradient Green, Yellow. Click the OK button to close the gradient editor window.
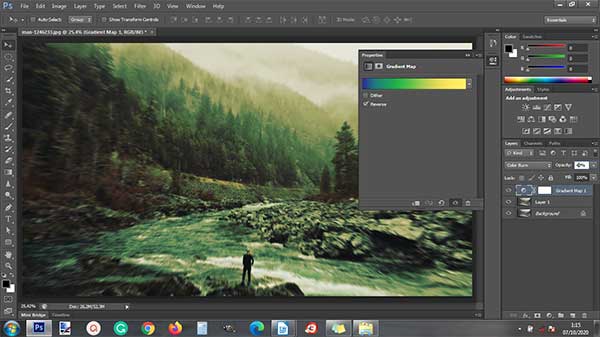
On properties, click reverse and change the gradient adjustment layer's blend mode to Color Burn. Set its Opacity to 40 percent.
Click on the gradient drop down menu to open the editor.
Gradient Editor.
Choose a Green, Yellow gradient color.
Check Reverse, set the opacity and change the blend mode to color burn.
5. Add Brightness & Contrast.
Select menu Layer> New Adjustment Layer> Brightness & Contrast. I'm going to set the brightness slider to a value of 50. You can add a vignette if desired.
Brightness & Contrast.
Here is the result:
Photoshop tutorial How to Create a Lomo Effect.


No comments:
Post a Comment