Here is a tutorial on Creating Sunset Effect in Photoshop Using a Gradient Map. If you want more flexible settings, then a gradient map adjustment layer is a better choice. At this time, we will explain how to create a sunset effect using a gradient map.
1. Open Photo With Photoshop Then Duplicate The Background Layer.
Select menu File> Open, click your photo then click the Open button. After the photo opens, duplicate the Background layer by pressing Ctrl + J key.
Stock for this Photoshop tutorial: 1978389.
Open the photo and duplicate the background layer.
2. Create a Gradient Map Adjustment Layer.
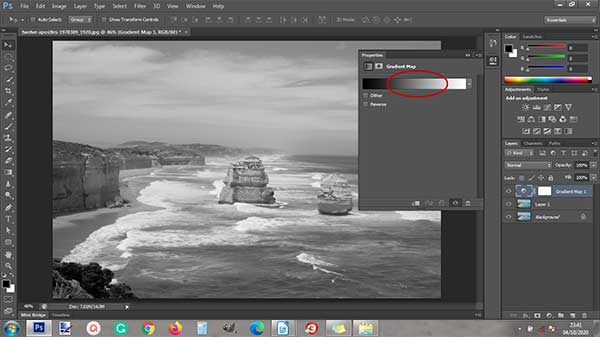
Go to Layer> New Adjustment Layer> Gradient Map. A gradient map adjustment layer will be formed with default properties of black to white. If the properties don't appear, double click on the circle to the left of the gradient map layer to display it. Then click on the gradient drop down menu (circled in red) to edit the color. The gradient editor window will appear.
Create a gradient map adjustment layer.
3. Adjust the Left Color Gradient Map.
In the gradient editor window, click on the lower left slider then click the color box. The color picker window will appear. In the color picker window, choose a red color.
Left gradient, select red color.
4. Adjust the Gradient Map Color to the Right.
In the gradient editor window, click on the lower right slider then click the color box. The color picker window will appear. In the color picker window, choose a yellow color. Then click the OK button to close the gradient editor window. Your photo should now be a yellowish red color.
Right gradient select yellow color.
5. Change the Gradient Map Layer Blend Mode to Overlay.
Change the blend mode of the gradient map layer to overlay and set its opacity to a value of 50%.
Change the blend mode of the gradient map layer to overlay.
6. Adjust Light Levels By Adding a Curves Adjustment Layer.
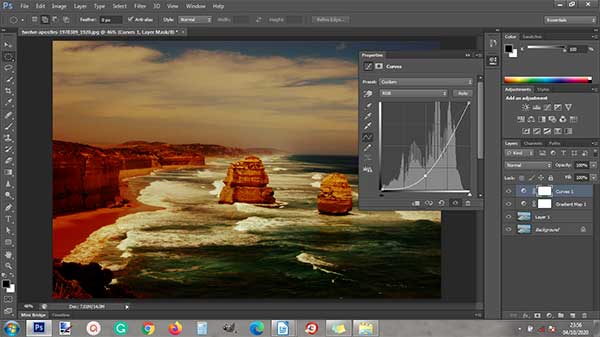
If your photo looks dark, adjust the light level using a Curves Adjustment layer. Go to Layer> New Adjustment Layer> Curves. The Curves layer will be formed. Click on the bow then drag it slightly upwards to get a lighter photo effect. Until here, the sunset effect on our photo is finished. If the result is not satisfactory, double click on the circle to the left of the gradient map layer to bring up the gradient editor. Please edit the red and yellow colors until you get a good result.
Adjust the brightness of the light by adding a Curves adjustment layer.
Here is the photo before applying the gradient map:
Photo before applying the gradient map.
And here is the photo after applying the gradient map:
After applying the gradient map.


No comments:
Post a Comment