We can use the Noise filter and Motion Blur to create a snow effect on the photo in Photoshop. The trick is to make a layer with black and blend mode Screen for the snow effect, add noise to the layer, add blur, add motion blur and finally adjust the amount of snow in the photo with adjustment levels. We can determine the direction of the snowfall by adjusting the angle in the motion blur window. If you want the snow effect in a more natural direction, duplicate the snow layer then transform it 180 degrees. Let’s get started!
Select menu File> Open or keyboard shortcut Ctrl + O to open your photo.
Open a photo with Photoshop.
2. Create a New Layer and Fill it with Black.
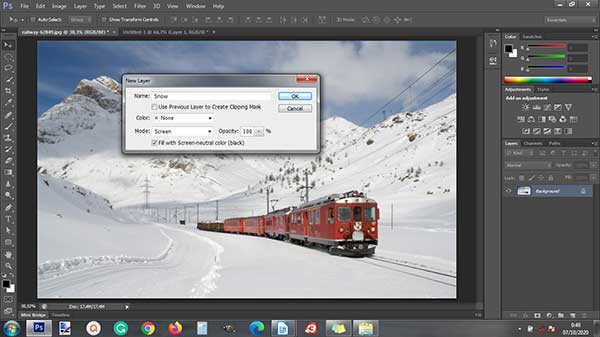
Go to Layer> New Layer. In the New Layer window, please enter a layer name, set the mode to Screen and check Fill with Screen Neutral Color (Black). Click the OK button.
Create a new layer.
3. Add Noise to the Snow Layer.
Select menu Filter> Noise> Add Noise. Please fill in the Amount, select Gaussian and tick Monochromatic. Click the OK button.
Add Noise.
4. Add Blur.
Blur the snow layer by choosing Filter> Blur> Blur.
Add Blur.
5. Add Motion Blur.
Select menu Filter> Blur> Motion Blur. Adjust the direction of the snowfall by filling in the angle and size of the snow by filling in the Distance. Click the OK button.
Add Motion Blur.
6. Set the Snow Amount With Levels.
Select menu Image> Adjustments> Levels. Please slide the slides on the Input Levels to adjust the amount of snow you want. When finished, click the OK button.
Adjust By Levels.
Here is the result:
Photoshop tutorial How To Add Falling Snow.


No comments:
Post a Comment