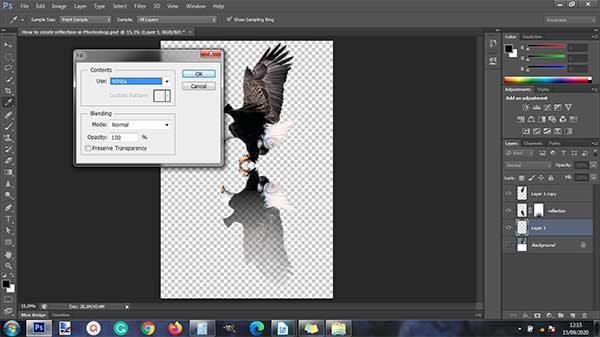
We can create a reflection in Photoshop on an object by simply creating three layers. The first layer (bottom layer) is for the background, the second layer is for the shadow and the third layer (the top layer) is for the object itself. The shadow on the second layer is created by duplicating the layer and then applying Flip Vertical with the Free Transform command. As for the shadow effect, we can use the Gradient tool by selecting Black, White Gradient and the Radial Gradient options. You can also add a Gaussian Blur if desired.
1. Open Photos Then Make a Selection.
Go to File> Open to open your photo and then make a selection of the object you want to shade using the Quick Selection Tool. After making a selection, duplicate the selection on its own layer by pressing Ctrl + J or go to Layer> New> Layer via copy.
Stock Photoshop tutorial: 142700-Pixabay.
2. Adjust By Cropping Photo.
Remove the Background layer's visibility option by clicking the eye icon to the left of the Background layer. Click the Crop Tool icon on the tool palette then crop your photo to just the object. Click then drag the mouse around the object then press Enter.
3. Duplicate the Layer to Double the Height of the Canvas.
Click Layer 1 then duplicate it by pressing Ctrl + J key. Rename the top layer to the name grasshopper and the layer below it to the name reflection. Click the reflection layer then increase the height of the canvas by selecting the menu Image> Canvas Size. Please double the size of the current height, then enter the height column. For the anchor you click on the middle. Click the OK button.
4. Flip Vertical Reflection Layer.
Click the reflection layer then press Ctrl + T to call up Free Transform. Flip Vertical by choosing Edit> Transform> Flip Vertical. Then scroll down using the mouse or the down arrow on the keyboard. Press Enter when you're done setting the reflection layer.
5. Apply Gradient to the Reflection Layer.
Click the Gradient Tool icon on the Tool panel. On the option bar, select Black To White and Radial Gradient. Create a layer mask by clicking on the reflection layer then clicking the Add layer mask icon. Start applying the gradient, while holding down the Shift key, click from the bottom of the canvas to the top.
6. Add a layer for the background and fill it with white.
Click the Background layer then click the Create a new layer icon. Fill the layer with white by choosing Edit> Fill. On the Use menu, select White and press the OK button.
Here is the result:
How to create reflection in Photoshop.


No comments:
Post a Comment