With Photoshop we can easily change the color of the photo or only in certain areas that we select by adjusting the hue / saturation. If you only want to change the color in certain areas in the photo, you have to make a selection first. Making a selection in Photoshop does require patience. In this example we will use the Quick Selection Tool selection tool which makes a selection based on the same color. Follow these steps:
1. Open the photo that you want to change its color.
Select menu "File" then "Open". Or you can also use the Ctrl + O shortcut. After the Open dialog box appears, browse to the location of your photo file by clicking on the Look In drop down menu at the top of the dialog box. Click your photo then click the Open button.
Stock for this Photoshop tutorial: 1699185-Pixabay.
2. Select a tool to make a selection.
I'll be using the Quick Selection Tool. Press the letter W on the keyboard or click the Quick Selection Tool icon on the Tool Palette. If the Quick Selection Tool icon is not visible, right click or hold click on the Magic Wand Tool icon to display more icons. Then on the Option bar, select Add To Selection (marked plus). Also choose a brush size adjusted to the object in your photo. To reduce the brush size press the opening bracket key [. To increase the brush size press the close bracket button].
3. Make a selection on the object of the photo that we will change its color.
Click on the parts of the photo that we want. The Quick Selection Tool will automatically make a selection based on the same color. If you want to delete unwanted parts of the selection, click on the selection while holding down the Alt key on your keyboard.
4. Click the Refine Edge button on the Option Bar.
Feel free to adjust the Radius, Smooth and Feather sliders to refine the selection. Then click the OK button.
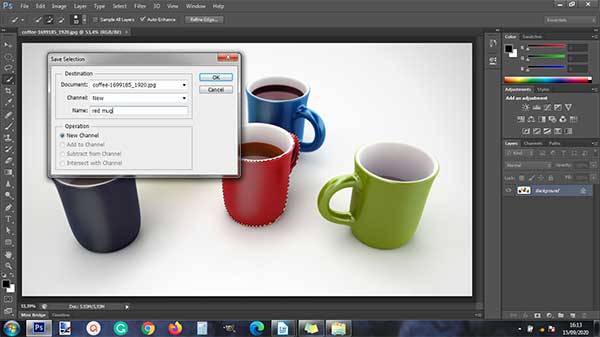
5. Save the selection if desired.
If you are afraid the selection will disappear after painstakingly making the selection, save the selection by selecting the "Select" menu and then "Save Selection". In the Save Selection dialog box, name your selection then click the OK button. The selection will be saved as a channel which can be accessed by selecting the menu "Window" then "Channel", or it could be by selecting menu "Select" then "Load Selection".
6. Change the color in the selection area.
With your selection still active, go to "Image", "Adjustment" then "Replace Color". In the Replace Color dialog box, move the Fuzzines slider to 200. Click the eye dropper icon marked plus (+). Then click your photo in the selection area that is not white. I'll click on the umbrella image. The color box appears to change color according to the color of the umbrella. Finally drag the Hue slider right or left to change the color. Once satisfied with the color click the OK button.
Before:
Here is the result:
How to Change Color in Photoshop
7. Save your project.
Select menu "File" then "Save", give a name then click the Save button.


No comments:
Post a Comment